Photography Dictionary: Must-Know Terms for Every Photographer
The Ultimate Photography Dictionary: A Beginner’s Guide Photography has its own rich set of terms and jargon, and for a beginner it can be overwhelming. In fact, experts say “it is difficult to take good pictures without having a solid understanding of ISO, Shutter Speed and Aperture”photographylife

The Ultimate Photography Dictionary: A Beginner’s Guide
Photography has its own rich set of terms and jargon, and for a beginner it can be overwhelming. In fact, experts say “it is difficult to take good pictures without having a solid understanding of ISO, Shutter Speed and Aperture”photographylife.com. This beginner photography guide doubles as a practical photography glossary—explaining essential camera terminology and technical photography words in plain English. We’ll cover the basics of exposure (ISO, aperture, shutter speed), principles of composition and framing, common lighting terms, lens and focus concepts, and key editing/post-processing formats. Think of this as your quick-reference dictionary for must-know photography terms and concepts.
Basic Camera Terms (ISO, Shutter Speed, Aperture)
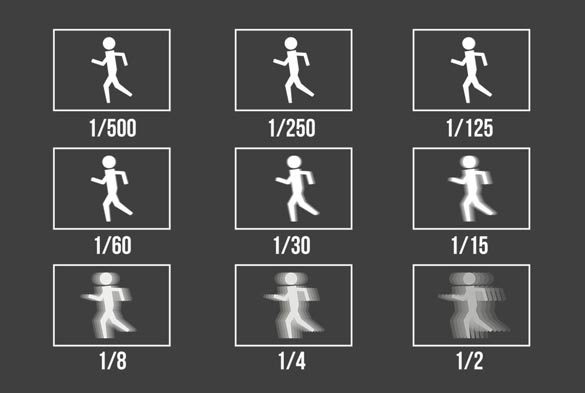
shutter Speed: This is the length of time a camera’s shutter remains open to expose the sensor to light. It’s typically measured in seconds or fractions of a second. A slow shutter speed (like 1/30s or 1/15s) lets in more light and can blur moving subjects, which is useful in low-light or creative motion shots. A fast shutter speed (like 1/250s or 1/1000s) lets in less light but freezes motion sharplyphotographylife.com. In short, longer exposures brighten the image and capture movement as blur, while shorter exposures freeze action.
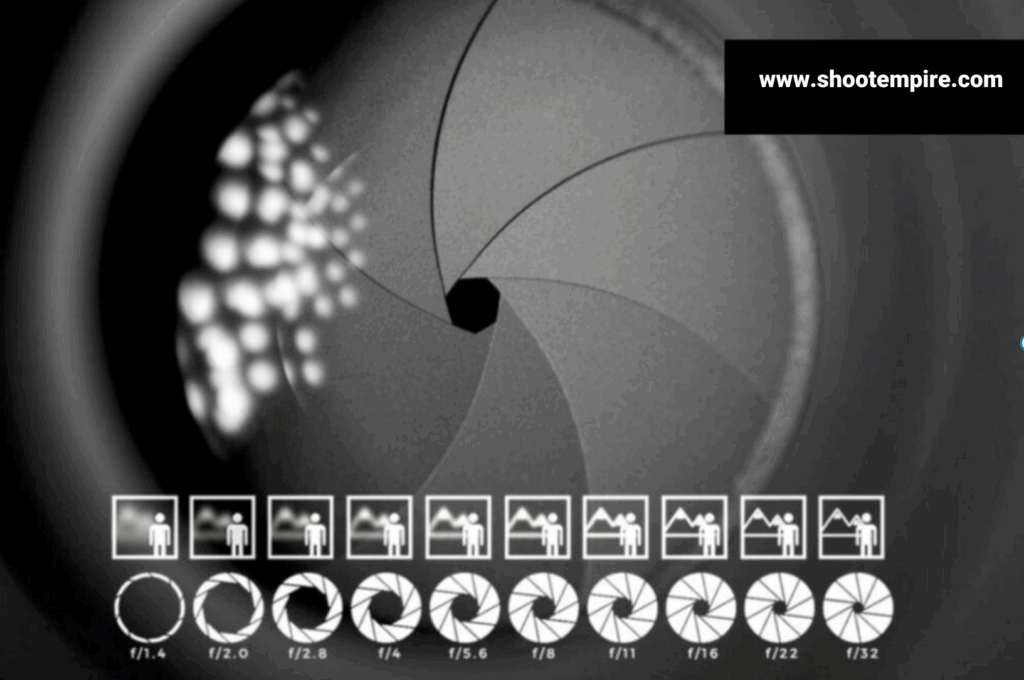
Aperture: This term refers to the size of the opening in a camera lens (the diaphragm). A larger aperture (represented by a smaller f-number, e.g. f/1.8) means a wider opening that lets more light in, while a smaller aperture (larger f-number, e.g. f/16) is a narrower opening admitting less light. Aperture also controls depth of field – the range of distance that appears in focus. A wide aperture (small f-number) yields a shallow depth of field (little of the scene in focus, with strong background blur), whereas a small aperture (large f-number) gives a deep depth of field (much of the scene in sharp focus)photographylife.com.
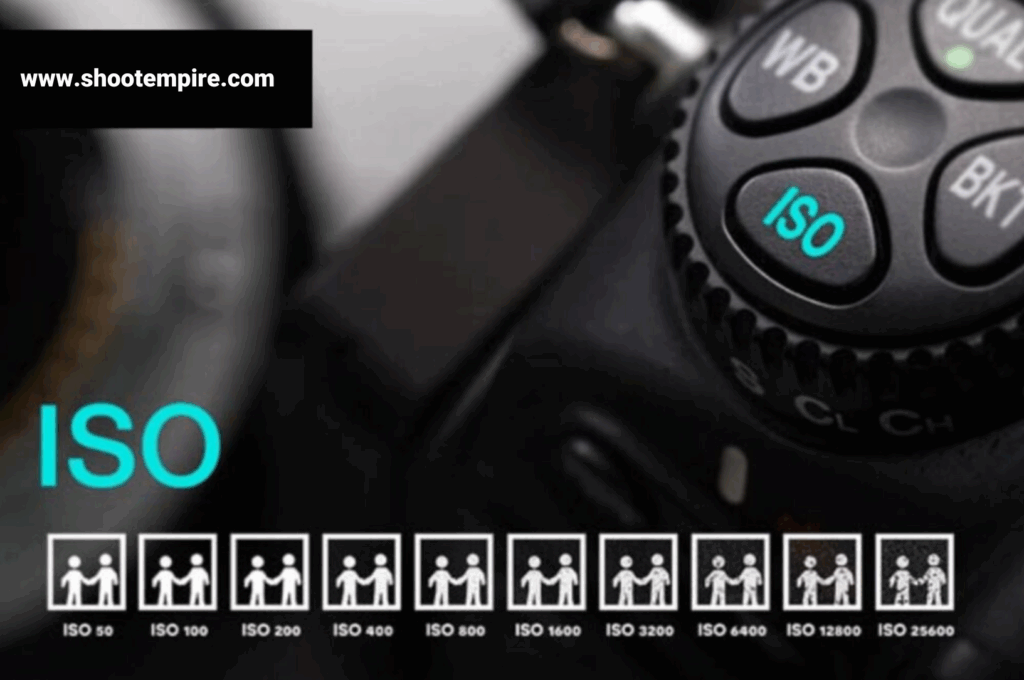
ISO: This is a measure of the camera sensor’s sensitivity to light. The lower the ISO number (e.g. 100 or 200), the less sensitive the sensor is, resulting in darker images with cleaner detail. Increasing the ISO (e.g. 1600, 3200 or higher) makes the sensor more sensitive and yields a brighter image in low light, but at the cost of more digital noise/grain. As a beginner’s rule, “a lower number is darker and a higher number means a brighter image,” but increasing ISO too much can degrade quality photographylife.com. In practice, ISO is used along with shutter speed and aperture (the three sides of the exposure triangle) to get a correct exposure.
Composition & Framing Terminology (Rule of Thirds, Leading Lines)
Rule of Thirds: A fundamental composition guideline is to imagine dividing your frame into a 3×3 grid. The Rule of Thirds suggests placing the main subject or horizon along these grid lines or at their intersections (“power points”) rather than dead-center digital-photography-school.com. For example, when photographing a horizon, you might position it along the top or bottom third of the frame, and place a subject (like a person or flower) at one of the intersecting points digital-photography-school.com. This off-center placement often creates a more balanced, dynamic image than centering everything. In short, aligning important elements with the gridlines typically leads to more pleasing compositions digital-photography-school.com

Leading Lines: These are lines within the scene that draw the viewer’s eye toward the main subject or point of interest. Leading lines can be anything – a road, railroad tracks, fences, tree lines, or even light and shadow patterns – that direct the eye through the image toward your subject adobe.com. For example, a winding path that starts at the bottom of the photo and curves toward a mountain will naturally lead the viewer’s gaze into the distance. Both straight or curved lines can serve as leading lines, as long as they guide attention in a deliberate way adobe.comadobe.com. Used effectively, leading lines add depth and flow to a photograph.
Lighting Terms (Soft Light, Hard Light, Backlight)
Lighting quality dramatically affects the look and mood of a photo. Soft light is diffused light that wraps gently around subjects, producing soft, gradual transitions between highlights and shadows. Natural examples include an overcast sky or light filtered through a softbox; soft light creates gentler shadows and flattering, even illumination. In contrast, hard light comes from a small or direct source (like bright midday sun or an undiffused flash) and produces crisp, dark shadows with sharp edges progradedigital.comen.wikipedia.org. Hard light yields high-contrast, dramatic images, while soft light is more subtle. Neither is better universally – the choice depends on the effect you want.
Backlight (or backlighting) is when the main light source is positioned behind the subject, often above its head. Backlighting creates a rim of light around the subject, separating it from the background and adding depth studiobinder.com. For example, a portrait shot with the sun behind the person can create a glowing hairline or halo effect. Backlight “hits the subject from behind…creating more depth and shape”studiobinder.com, turning a flat scene into a more three-dimensional image. It’s a common technique in both photography and cinematography to make subjects stand out.
Lens & Focus Terminology (Bokeh, Depth of Field)
Bokeh: Pronounced “boh-kay,” bokeh refers to the aesthetic quality of the out-of-focus areas in a photo. Specifically, it’s the way a lens renders out-of-focus highlights and background blur en.wikipedia.org. Good bokeh is typically smooth and pleasing (with round, soft circles of light), while harsh bokeh can be distracting. Bokeh is most noticeable around small bright points (like string lights or highlights) when shot with a wide aperture lens. In practice, to get noticeable bokeh, photographers use a wide aperture (small f-number) to blur the background creatively.
Depth of Field (DOF): This is the range of distance in a scene that appears acceptably sharp. In technical terms, DOF is “the distance between the nearest and the farthest objects that are in acceptably sharp focus” in the image en.wikipedia.org. A wide aperture (e.g. f/1.8) produces a shallow depth of field – only a small slice of the scene (the subject) is in focus, and the rest is blurred. A small aperture (e.g. f/16) yields a deep depth of field, meaning most of the scene from foreground to background is in focus. (As noted above, aperture controls depth of field – small f-numbers = narrow focus zone, large f-numbers = wide focus zone photographylife.com.) Photographers often balance DOF and bokeh: shooting wide open (large aperture) gives strong bokeh and shallow DOF, while stopping down (smaller aperture) brings more of the scene into focus.

Editing & Post-Processing Terms (RAW, JPEG, White Balance)
Modern cameras offer different file formats and color controls. RAW and JPEG are the two main image file types. A RAW image is essentially a digital “negative”: it contains the unprocessed (or minimally processed) data straight from the camera’s sensorphotographylife.com. Shooting in RAW preserves the most image information (wider dynamic range and color data) and lets you make heavy adjustments (exposure, white balance, etc.) in post-processing without losing detail. However, RAW files are large and must be converted with software before sharing.
By contrast, JPEG is a processed, compressed image format. When you shoot JPEG, the camera applies settings (white balance, contrast, sharpening, color profile) and compresses the image in-camera photographylife.com. This makes JPEG files much smaller and immediately usable on most devices, but at the cost of losing some color/brightness information. In other words, JPEG is ready to use straight out of camera (all settings “baked in”), whereas RAW needs editing photographylife.comphotographylife.com. An advantage of JPEG is convenience and compatibility; a disadvantage is limited flexibility in editing.
White Balance: This refers to adjusting the colors in an image so that whites (and neutral colors) look “true” under different lighting. Different light sources have different color temperatures (e.g. daylight is bluish, tungsten bulbs are warm/orange). White balance settings compensate for this to avoid color casts. For example, setting the camera’s white balance to “tungsten” will neutralize the yellow cast of indoor bulbs, making whites appear white murrayparkphotography.weebly.com. If the white balance is incorrect, the photo may look too blue or too orange. (For RAW shooters, white balance can be adjusted freely during editing.) Correct white balance ensures that colors appear natural, and images taken under a given light source are adjusted to neutralize any unwanted tint murrayparkphotography.weebly.com.
This photography glossary has covered the must-know terms for beginners – from technical camera settings to composition and editing language. Armed with these definitions of ISO, aperture, rule of thirds, bokeh, RAW, and more, you can better understand tutorials, camera manuals, and the advice of other photographers. Happy shooting!
Related services:
Ready to plan your event coverage?
Tell us your event details and we’ll recommend the right coverage plan, team size, and turnaround timeline.
Start a booking · View event photography packages · Talk to concierge